

Scribal Profile Unknown | |
| Current Manuscript: | Cambridge, St John's College MS E. 2 (105) |
| Folios: | 1-38 |
| Sampled Folios: | 6r, 17v |
| Example Page: | Display a full page showing this scribe's hand |
| Image Rights: | Reproduced by kind permission of the Master and Fellows of St John's College, Cambridge. All images on this website are reproduced with permission of the Libraries, Archives, and Owners of the manuscripts. Manuscript images that appear on this website remain in the copyright of the libraries where the manuscripts are held. Use of these images for any purpose other than private study without written permission of those libraries is prohibited by law. |
| A | |||
 | Usage: a middes double compartment 'a' is used throughout. In this example there is a small horn at the head. |  | Usage: And one of several versions of upper case 'A'. The square lobe is large. |
 | Usage: Ad Latin rubric in green ink. |  | Usage: Aries a different version of 'A' |
| D | |||
 | Usage: meridionall looped 'd' used throughout. The lobes of most 'd's are small. |  | Usage: diuided a pointed lobe for 'd' occurs several times on this folio. |
 | Usage: cognoscend 'd' in final position with tag for abbreviation of the Latin word. | 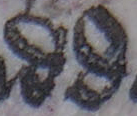 | Usage: a middes |
| G | |||
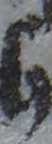
 | Usage: amonge the scribe uses a tailed 'g' where the tail is not linked back to the upper compartment. | 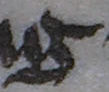 | Usage: among 'g' as the final letter. The formation of this 'g' is like version 1 but here the scribe has made a connecting stroke between the upper and lower elements of the graph. |
 | Usage: degree a double compartment graph. |  | Usage: longe a tailed 'g' with tail which moves to the right away from the upper lobe, then turns clockwise and travels beneath the graph as a horizontal stroke. |
| H | |||
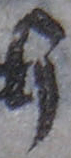 | Usage: ryȝth whilst the stems of 'h' are generally similar, the heads vary. Here 'h' has angular head-loop which grazes the shoulder as it returns to the stem. | 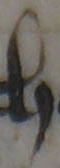 | Usage: wheche in this version, the stem is very upright and the loop crosses the stem above the level of the shoulder. |
 | Usage: nyȝth just a small curl at the top of the stem at the head of this graph. | ||
| R | |||
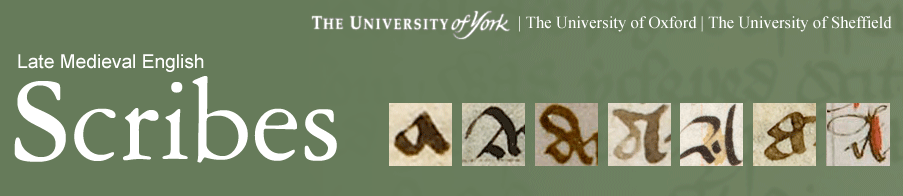
 | Usage: very long 'r' and modern 'r' are both used by this scribe. |  | Usage: nadir |
 | Usage: bordo(ur) 'z'-shaped 'r' follows 'o'. |  | Usage: Ryng |
| S | |||
 | Usage: as sigma 's' in final position. |  | Usage: nu(m)bres a cross between kidney and 8-shaped 's' in final position. |
 | Usage: Sagittari(us) the head of long 's' is separate in this example. |  | Usage: sygne |
| W | |||
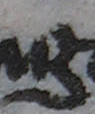
 | Usage: wheche 'w's are consistently formed with 'B'-shaped element to the right. |  | Usage: wiþ |
 | Usage: be twen |  | Usage: will there is a tendency on some 'w' graphs to shorten the left limb. The connection between left and middle arms is made half way down the middle stroke. |
| Y | |||
 | Usage: lytyl 'y' is often two thick parallel strokes. The tail is a very fine line which descends to the left and then turns counter-clockwise and retraces the line of the descending stroke. |  | Usage: ys |
 | Usage: vndyr |  | Usage: almury |
| Thorn and Yogh | |||
 | Usage: þe thorn used frequently for all the usual words as well as occasionally replacing 'th'. | 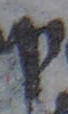 | Usage: boþe |
 | Usage: oriȝont yogh is used to represent the plural 'z' sound. |  | Usage: ryȝht it is also used as representative of the 'gh' sound. |
| l, b, k, s | |||
 | Usage: almury the stems of tall letters often have a detached head stroke. |  | Usage: bordo(ur) |
 | Usage: prikkes |  | Usage: same |